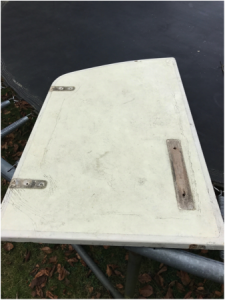
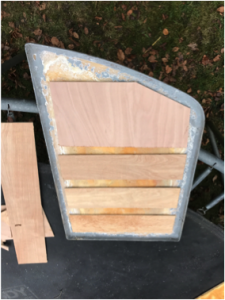
When we bought Scallywag, the locker covers and bomb doors were very flexible, cracked and didn’t inspire any confidence that you could walk on them.
As you can see, they were very tired looking and where the reinforcement ended, there was extensive stress cracking visible.
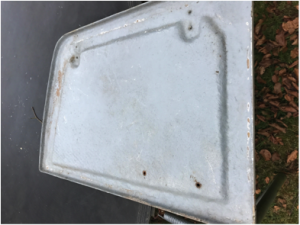
On the reverse, there was a big gap between the reinforcement and the edge where the locker rim sat.

The first job was to understand what we had, and the nature of the problem. I decided to cut the reinforcement off using a circular saw to cut the backing off.
I have a saw that runs on a track which meant I could set the depth to cut the reinforcement off without damaging the front side of the cover which whilst cracked wasn’t actually broken at any point.
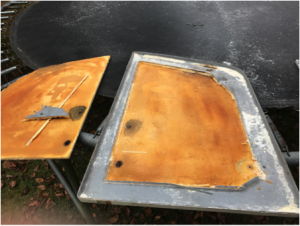
I found that the reinforcement was foam in-between 2 sheets of GRP, and in our case was sodden, dripping water extensively. Once cut through, I used a big screwdriver to pry up the backing and removed it.
I then used some nail removing pliers to tear off the edges aiming the get them completely flat for the new reinforcement and GRP to bind to.
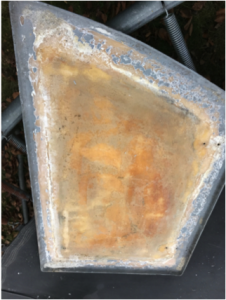
Once the loose material was removed I was left with some jagged remains of the old backing layer that need to be dealt with.
To get a flat and smooth finish I used a belt sander to grind away the remnants and leave a good clean finish for the new GRP to adhere to.
As the photo shows, you can get rid of all the old backing and be left with what is essentially just the outer shell. You do need to take care at this point because the shell is quite wobbly and needs stable support to ensure it stays flat when you remake it.
In doing all 3 locker covers we learnt as we went along what makes the best repair. There is a compromise between lightness and strength and whilst I didn’t mind a bit more weight I certainly didn’t want more than I had to have.
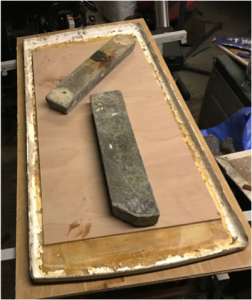
We tried a layer of matting with some 5mm ply bedded into it, 5mm ply bedded straight onto resin in the cover and then strips of ply bedded into resin. To finish off we then layered in another layer of matting on the outside of the ply to reinforce the lid further and waterproof the whole thing.
I was using 300gsm matting for the simple reason, that’s what I happened to have, however if I was buying it specifically I would go down to something like 150gsm as it take a lot less resin to impregnate it properly.
The key is to ensure a good adhesion between the plywood reinforcement and the locker lids. I found that the layer of matting with strips of ply gave the strongest and lightest solution. I think the change in profile between the strips acted like folds in cardboard also providing reinforcement.
To ensure the quality of adhesion I used some heavy weights to sit on the ply forcing it into the GRP. Once it had dried it was pretty solid and I couldn’t move the ply at all.
The next step was to chamfer the edges of the plywood prior to applying the final layer of GRP. This isn’t vital but it does help the new GRP to lay flush without a sharp angle that the glass matting doesn’t follow easily.
To get a good finish on the top surface, I put some polythene on the top of the wet GRP Resin/Matting lay up and used a small wallpaper roller to flatten it down to a good finish. You need to leave the polythene on until the GRP resin has dried or you’ll lift it all up again!
Once complete I then l trimmed all the edges back neatly and painted the new GRP with Danboline paint to protect it. I also painted the outside with gloss to improve the look and used anti-slip pearls to give a good grip.
On refitting I found that the remade lockers sat higher slightly than the original ones had and so I had to remove the hinges from the boat and refit them slightly higher. This involved drilling out the rivets and replacing them with stainless nuts and bolts.
I followed the same process with the bomb-doors on the anchor locker but did have to do an outer skin repair where they had cracked with people walking on them. The repair was straightforward, I used an angle grinder to remove the damaged areas and forced the crack open with a screwdriver when applying the first lay up. I put tape on the outside once the gap had filled to prevent the resin from dribbling through onto the floor.
Once the outer skin repair was complete I followed the same process above to make the doors building strength back in.
I needed to put a shim/spacer under the hinges when reassembling them to allow the doors to sit flat because they ended up a bit thicker.
The new covers and doors fit well, look loads better and inspire confidence in walking on them so that we won’t avoid doing so in the future.
Thoughts;
I used GRP Resin rather than Epoxy because I have found that Epoxy does not adhere well to GRP in the past.
Next time I would use a lighter glass matting to save a bit on weight, I ended up using 3kg of resin to repair 3 locker doors and 2 bomb-doors.
The repaired doors are about 25% heavier than the original, however, in our case because of the retained water in the foam, they are actually lighter.
I didn’t use the strip method in the bomb-doors because I felt the strips would take too much reinforcement away and I wanted to provide support across the cracks in the outer skins.
You do need to be brave and remove all the old material, I used a circular-saw, but an angle grinder would work well too. You would need to be careful in cleaning up the old edges though.
You do get lots of GRP dust produced, especially when using a belt sander of grinder, wear a mask and do it outside if you can.
It took 3-4 days to do each item by the time you allow drying times and if you only have space to do one at a time, it will take some time to get them all done.
Not including time, the GRP Resin and Matting cost in the region of £120 to do all 5 covers/doors. I also replaced the original rivets with stainless bolts, ny-lock nuts and washers at the same time which is a much better, and more versatile, means of attachment.